Smiley Buttons
In this chapter, we will explore how to use the two onboard buttons of the micro:bit. The Smiley Buttons project is a great beginner-friendly exercise that introduces interactive input. By pressing the built-in buttons A and B, we will display different facial expressions on the micro:bit's LED screen.
-
Press button A to show a happy face 😊
-
Press button B to show a sad face 🙁
Understanding Buttons
🪝 From the micro:bit documentation:
Buttons operate in a typical inverted electrical mode, where a pull-up resistor ensures a logical ‘1’ when the button is released, and a logical ‘0’ when the button is pressed
This may sound a bit technical at first, so let us explain it more clearly.
When the button is not pressed, the micro:bit reads the input as a logical HIGH (i.e 1). This is due to the presence of a pull-up resistor, which maintains a high voltage level on the input pin.
When the button is pressed, the circuit is connected to ground, and the micro:bit reads a logical LOW (i.e 0).
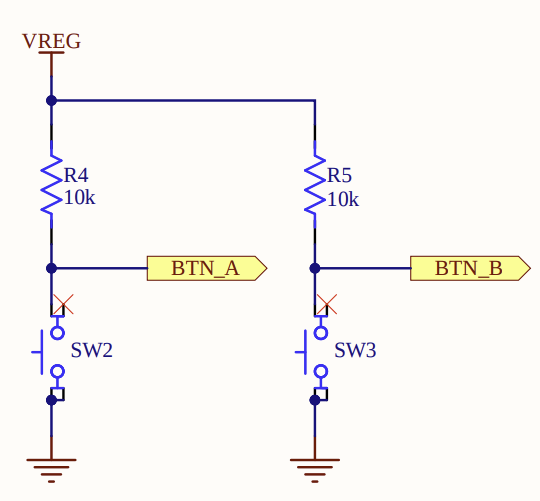
Although pressing a button might intuitively seem like activating something, the hardware works in an inverted way. In code, we check for a LOW signal to detect when the button is pressed. Therefore, we will use the is_low() method on the button inputs to check whether it is being pressed.
Create Project from template
To generate a new project using the template, run the following command:
cargo generate --git https://github.com/ImplFerris/mb2-template.git --rev 88d339b
When prompted for a project name, enter something like smiley-buttons
When it prompts to select "BSP" or "HAL", select the option "BSP".
Matrix for emojis
Here is a 2D arrays representing the happy and sad faces.
#![allow(unused)]
fn main() {
let happy_face = [
        [0, 0, 0, 0, 0],
        [0, 1, 0, 1, 0],
        [0, 0, 0, 0, 0],
        [1, 0, 0, 0, 1],
        [0, 1, 1, 1, 0],
    ];

    let sad_face = [
        [0, 0, 0, 0, 0],
        [0, 1, 0, 1, 0],
        [0, 0, 0, 0, 0],
        [0, 1, 1, 1, 0],
        [1, 0, 0, 0, 1],
    ];
}
Initialization
As usual, we begin by initializing the board, followed by the display and the timer. We also access button_a and button_b from the board and store them in variables for convenience.
#![allow(unused)]
fn main() {
    let board = Board::take().unwrap();

    let mut display = Display::new(board.display_pins);
    let mut timer = Timer::new(board.TIMER0);

    let mut button_a = board.buttons.button_a;
    let mut button_b = board.buttons.button_b;
}
Button Input and Showing Smiley
Now that the buttons and display are initialized, we can write a loop that reacts to button input and shows the appropriate facial expression on the LED screen.
#![allow(unused)]
fn main() {
    loop {
        let a_pressed = button_a.is_low().unwrap_or(false);
        let b_pressed = button_b.is_low().unwrap_or(false);

        if a_pressed {
            display.show(&mut timer, happy_face, 1000);
            timer.delay_ms(100);
        } else if b_pressed {
            display.show(&mut timer, sad_face, 1000);
            timer.delay_ms(100);
        }
    }
}
In this loop, we check the state of each button using the .is_low() method. Since the buttons on the micro:bit are active-low, this method returns true when the button is pressed. We use .unwrap_or(false) to handle any potential errors. If the result cannot be read for any reason, it will simply return false, treating the button as unpressed.
When button A is pressed, the happy face pattern is shown on the LED display for one second. Similarly, if button B is pressed, the sad face is displayed.
A short delay of 100 milliseconds follows each display to give a clear visual effect and to avoid repeated updates caused by the button being held down.
The Full code
This exercise includes a new import not present in the previous one: embedded_hal::digital::InputPin. This trait is part of the Embedded HAL and provides methods such as is_low() and is_high() for reading the state of input pins.
#![no_std]
#![no_main]

use cortex_m_rt::entry;
use embedded_hal::{delay::DelayNs, digital::InputPin};
use microbit::{display::blocking::Display, hal::Timer, Board};

#[panic_handler]
fn panic(_: &core::panic::PanicInfo) -> ! {
    loop {}
}

#[entry]
fn main() -> ! {
    let board = Board::take().unwrap();

    let mut display = Display::new(board.display_pins);
    let mut timer = Timer::new(board.TIMER0);

    let mut button_a = board.buttons.button_a;
    let mut button_b = board.buttons.button_b;

    let happy_face = [
        [0, 0, 0, 0, 0],
        [0, 1, 0, 1, 0],
        [0, 0, 0, 0, 0],
        [1, 0, 0, 0, 1],
        [0, 1, 1, 1, 0],
    ];

    let sad_face = [
        [0, 0, 0, 0, 0],
        [0, 1, 0, 1, 0],
        [0, 0, 0, 0, 0],
        [0, 1, 1, 1, 0],
        [1, 0, 0, 0, 1],
    ];

    loop {
        let a_pressed = button_a.is_low().unwrap_or(false);
        let b_pressed = button_b.is_low().unwrap_or(false);

        if a_pressed {
            display.show(&mut timer, happy_face, 1000);
            timer.delay_ms(100);
        } else if b_pressed {
            display.show(&mut timer, sad_face, 1000);
            timer.delay_ms(100);
        }
    }
}
Clone the existing project
You can also clone (or refer) project I created and navigate to the bsp/smiley-buttons folder.
git clone https://github.com/ImplFerris/microbit-projects
cd microbit-projects/bsp/smiley-buttons
Flash
With the code complete, you can now flash the program to the micro:bit using the following command:
cargo flash
Once the program is running on the device, pressing button A will display the happy face, and pressing button B will show the sad face on the LED display.